Each of your calendars has its own set of rules and parameters, starting with the type of appointment it is. Those differences mean meetings may vary in length or frequency. When creating or editing a calendar, you can modify the days, times, and frequency inside the Availability tab.
To access them, go to your Calendar Settings inside the Calendar section.

Click the pencil icon to open the editing module.

Available Hours
These are the days and times your calendar is available for booking. In all calendars, except Event Calendars, this corresponds to the available times for the selected user(s).

You can edit users individually by clicking their name.

To modify only the available hours within the calendar, select Custom Schedule.

📌Note: Selecting Work Hours will modify the user's availability at a higher level in the system. This option is only available when modifying a single user.
Date Specific Hours
By setting Date Specific Hours, you can override your regular weekly schedule for selected dates. To do so, click Add Date Specific Hours.

Click the date you need to customise, then set your available hours or click the trash can icon to mark it as unavailable.

Once you're happy, click Submit. Any date-specific hours you've submitted will be listed in a grouped-by-date format across all selected users.

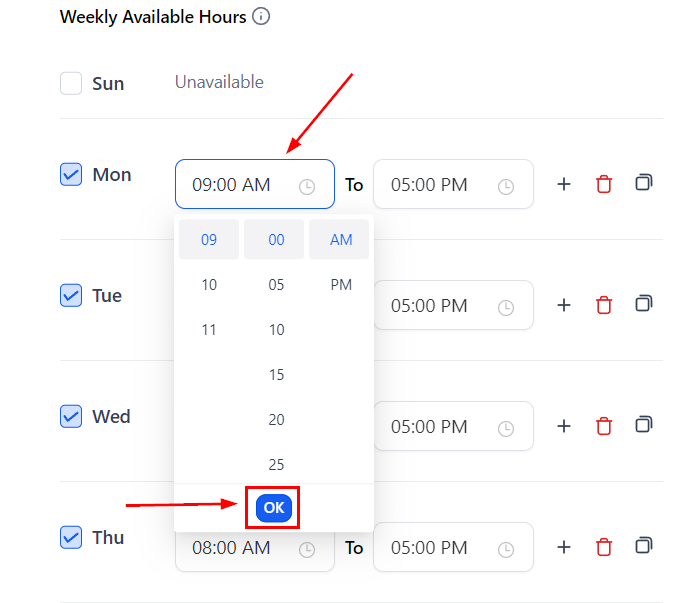
Weekly Available Hours
Available for Event Calendars, these are the standard days and times when the calendar is available for booking. You can modify the schedule by checking or unchecking the corresponding boxes.

To change the available hours, click on the starting or ending time. Select a new time from the scroll menu and click Ok to set it.
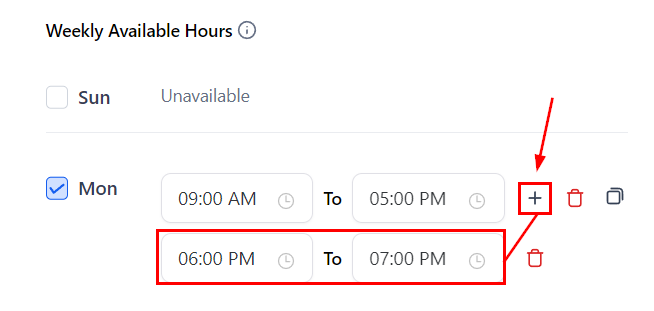
If there's a gap between available times, click the + sign button to add the extra hours.
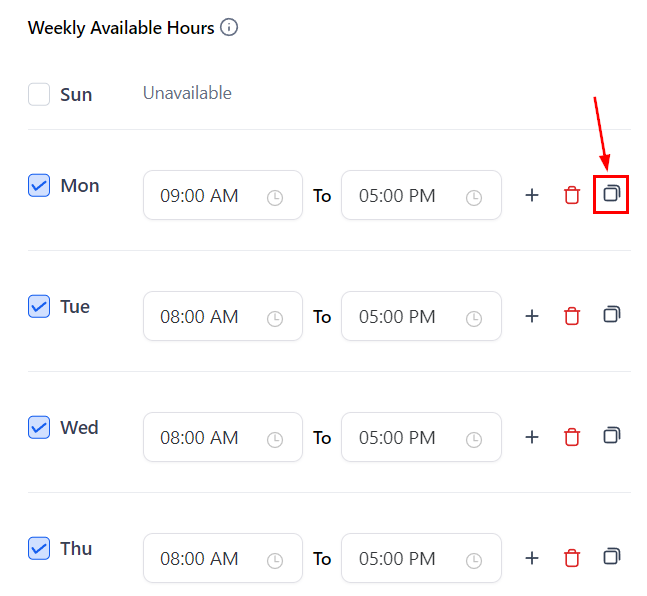
After setting the available hours for a day, you can click the two-square icon to copy the settings to all other selected days.
Booking Rules
This defines the expectations for each available time slot. They may vary slightly depending on the type of calendar selected, but generally they are:
- The meeting interval controls how frequently appointments can be booked.
- The Meeting Duration sets the expectation for how long the appointment will last.
- To prevent surprise appointments, set a Minimum scheduling notice. This limits how soon contacts can schedule with you.
- The Date Range limits how far in advance an appointment can be booked.
- The Pre and Post Buffer Time acts as a cushion between appointments, giving users time to rest and reset.
- The "Maximum bookings per day" setting determines the total number of appointments allowed in the calendar per weekday.
- The "Maximum bookings per slot" defines how many contacts can be scheduled in the same time slot in a team member's calendar.

You're now ready to set the availability for your calendars and get the hours right for you and your team. Bear in mind that these available hours apply to the entire calendar and do not affect each user's individual available hours. To learn more about configuring your profile hours, see the article "How to Update Your Personal Availability". For more on managing calendar availability, check the articles "How to Set Up Recurring Appointments" and "Look Busy in Calendars".