One of the best ways to drive sales is social media engagement. Organic social media engagement is especially valuable since it's solid proof that a customer is interested in your services. Of course, you don't have all day to check Facebook and respond, so why not automate it?
By using this feature you can make sure you never miss a follow-up opportunity. Before you start, make sure your Facebook account is integrated, and for Instagram check that the icon is coloured. If you haven't done this yet, take a look at our other articles for instructions on how to connect it.
Let's start with the trigger "Comment(S) On A Post". You have the option to add this for Facebook and Instagram.

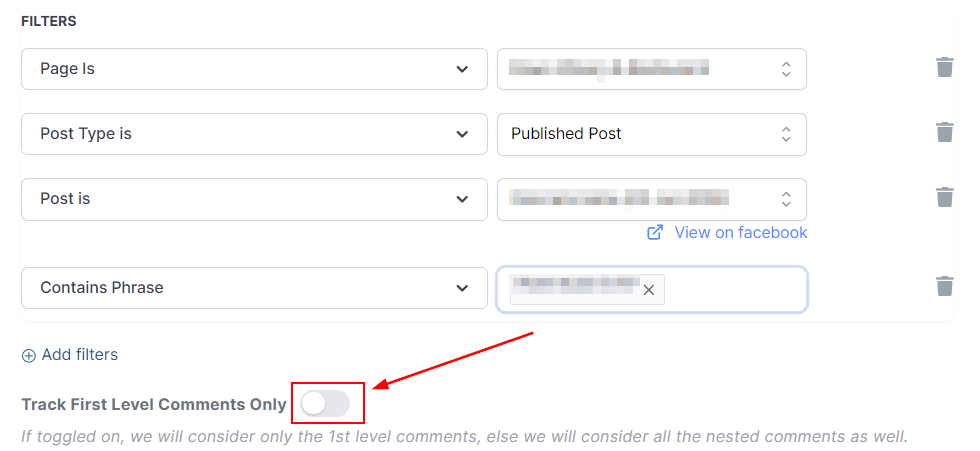
Your first step here is to select the page, then select the Post Type. There are two post types: Published post, which includes all posts on your page, and Custom Post, which pulls up posts based on the Meta URL or ID.

Now select the post you want to track. You can click the hyperlink to view the post on Facebook or Instagram. Once selected, click Add filters to limit the kind of response to look for.

You can choose between "Contains Phrase" and "Exact Match". Contains Phrase looks for comments that contain the desired phrase somewhere in the message; Exact Match will only trigger the automation if the message matches exactly what you typed.

You can also toggle Track First Level Comment Only. This means the automation only triggers on the first comment, so replies are excluded.
If someone is interacting with your page for the first time, they'll be saved as a contact with their First and Last Name stored. From there, you can use the actions in the Communications category to keep the conversation going.
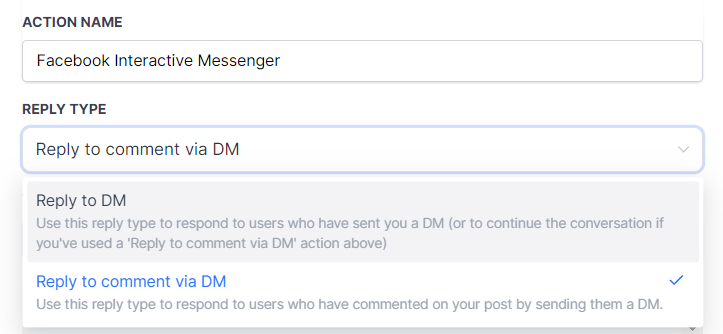
One action you can use for that is the Interactive Messenger. This lets you send a Messenger message to contacts who have interacted with your Facebook or Instagram page in the last 24 hours.

The first step is to select the Reply Type. This could be "Reply to comment via DM" to respond to comments on a post, or "Reply to DM" to send a response to direct messages from the customer. If you want to keep responding to messages inside the workflow, any response after the first Reply to a comment via DM will be a Reply to DM.
After selecting the Reply Type, configure the message to send. You can write your message directly or choose one from your templates. You can also add attachments by clicking Select an attachment and uploading from your drive or entering a URL.

You can also add buttons to your messages. You can set up a button to redirect the contact to your website or calendar, to give them your number for calls, or to trigger a subsequent action inside the workflow. The button names appear as options for the customer, and the wait step tells the system how long to wait for a reply before moving them to the default branch.
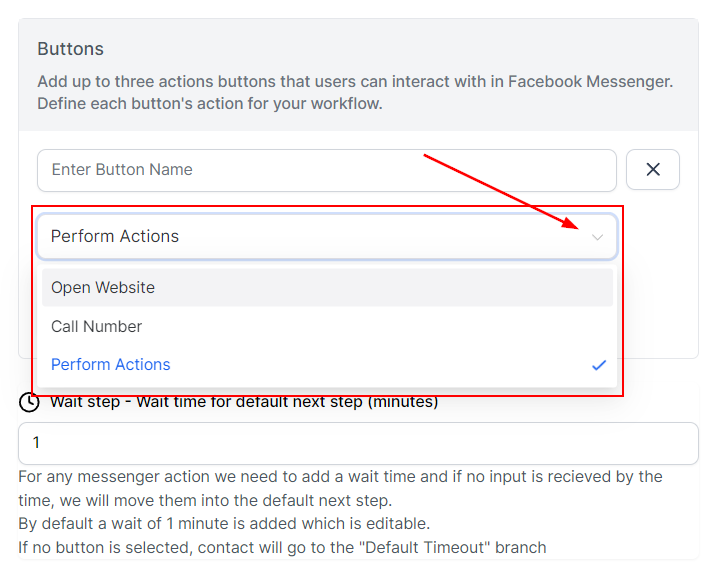
Once the action is added, you'll see one branch for each button you added and the Default branch, ready for the next actions.

📌Note: When using the Call Number button no further actions can be added underneath; instead, the contact will be moved to the Default branch.
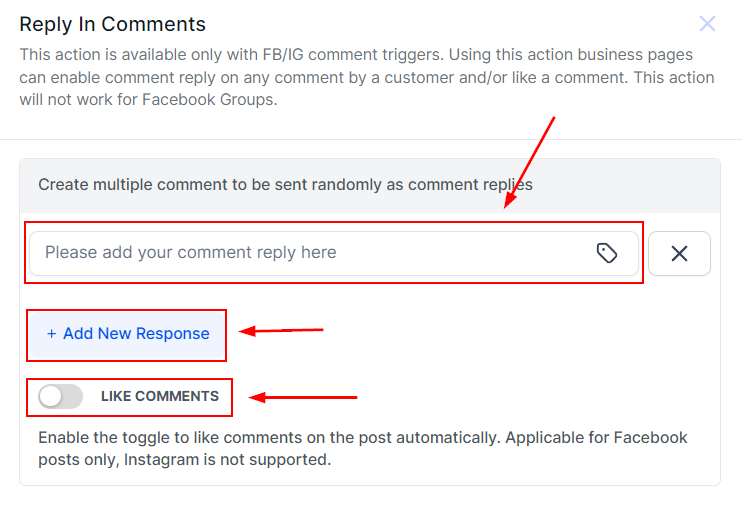
Another action to keep engagement going is "Respond on comment", which lets you reply to comments directly on the post. You can set up multiple responses and the system will randomly select which one to use, or, by toggling the button, like the comment.
You can also send a Messenger or Instagram DM directly. Keep in mind that for this action to work, the conversation needs to have been active within the last 24 hours.

Here you can select from your templates or write the message you want to reply with directly, and add any attachments by uploading them or adding the URL.
That covers the basics of using the system to respond to customers via Facebook and Instagram. We hope this helps you drive engagement, brand recognition, and sales!